August 31, 2011

The War on Cavities...

I have already disclosed the fact that I have a sweet tooth,  so this should come as no surprise.  One day at work, we were craving something sweet that was fast & easy and did not need cooking.

What we came up with was our version of an Almond Joy candy bar.  What we call them (still) is Crack Balls.  I know it's a bit lewd,  but there's a very good reason.  Once you try it,  you're hooked.

These are super easy to make and if you have kids, something they can help with since there is no cooking involved,  however I might refrain from calling them Crack Balls...  Coconut Truffles is what I call them when I'm telling someone outside of the kitchen about them.

Coconut Truffles
  • 2 cups toasted coconut
  • 1 1/2 - 2 cups sweetened, shredded coconut
  • 1 -  14oz can sweetened, condensed milk
  • 1/2 tsp kosher salt
  • 2 cups melted chocolate
  • 2 cups chopped almonds or peanuts

1.  Combine coconut (both kinds), condensed milk and salt in a bowl.

2.  Using a small cookie scoop (or a teaspoon),  scoop out mixture and place on a sheet pan lined with parchment paper.


3.  Place them in the freezer for about an hour to set up.

4. Roll them in your hands to make a nice smooth ball.


5. Working quickly,  dip them in the melted chocolate and then into the chopped nuts and set on a clean sheet pan.  If they start to get too warm, put them back into the freezer for a few minutes. 

Once they are all dipped and rolled in almonds or peanuts, put them in the refrigerator for about 15 minutes to set up.  DONE!


Next time there is a bake-sale at school, instead of staying up baking cupcakes, make these. 
You'll be glad you did.

August 27, 2011

Black & Blue

While Hurricane Irene is approaching,  I'm doing what any sensible girl would do...  making jam.  I like the simplicity of freezer jam because you still get all the flavor of summer fruit,  but it is quicker and easier than sealing everything in a water bath and let's be honest,  sometimes a girl just needs a "shortcut".

This recipe will take approximately 20 minutes from start to finish,  then the jars will sit for a few hours and it's done.  How easy is that?!  The best part about this is making whatever flavor combination you like.  That's the fun part of cooking,  there really aren't many "rules" when it comes to combining flavors.  If you like it,  that's what counts.

I bought my berries in the middle of summer when they were at their peak and stored them in the freezer until I was ready to make jam.  The best way to do this is to lay them out in a single layer on a sheet pan and put them in the freezer for a few hours until they are completely frozen.  Then put them into a resealable freezer bag.

I was fortunate enough to find organic ones in pristine condition, so I loaded up!   That is the only mandatory condition when making jam:  the fruit you use absolutely MUST be perfect.  If it has any bruising, remove it.  If there is even the tiniest bit of mold, toss it.  

The last thing you want to do is introduce that into an entire batch of jam because it will ruin everything (there goes all of your time, effort and money).

That being said, let's get started... 


Black & Blue Jam
  • 3 1/2 cups blueberries
  • 1 1/2 cups blackberries
  • 1/3 cup fresh lemon juice (2 or 3 lemons)
  • 2 1/2 cups granulated sugar
  • 1/3 cup powdered, no sugar/low sugar pectin
  • seven 8-oz freezer jam jars

Berries & Lemon Juice


  1. Thoroughly wash, rinse & dry jars & lids.
  2. Crush fruit slightly, or more if you like smoother jam.
  3. Add fruit & lemon juice to a medium pot and bring to a boil over med-high heat.
  4. Whisk together sugar and pectin and add to fruit,  stirring until dissolved.  Return to rolling boil and boil 1 minute.  Remove from heat.
  5. Transfer to jars,  leaving a 1/2" space on top.  Seal and let sit at room temp for 2 - 3 hours, until jam is set.
  6. To store, freeze for up to 6 months or refrigerate and use within 3 weeks.

black & blue jam

sealed and ready for the freezer


*recipe courtesy of  Everyday Food

August 20, 2011

Good For the Soul

Sometimes we get caught up in the everyday, letting other things go by the wayside.  Our days become filled with the same routine:  go to work, make dinner, wash dishes, wash clothes, clean the house, go grocery shopping, run errands, etc.  
Life just seems to get in the way of having,  well....  a life.

Often times, we don't mean to let important things get pushed to the back burner and when we make time for them, we realize just how much they mean to us.

My visit with Sonali & Tracey was just that.  It had been 6 years since the three of us had all been together,  even though we are in touch with each other we hadn't had actual face time.   When we sat down and realized it had been that long,  I think we were all a bit shocked.

The three of us had met in Culinary school and had become fast friends.  We would pore over food journals and magazines as if they were salacious material in front of adolescent boys.  We would laugh & refer to it (lovingly) as "food porn",  a term I still use with frequency I might add...

Just Graduated from Culinary School!

We had a lovely BBQ,  with Sonali's charming husband graciously manning the grill (thank you Jack), all four children playing beside us, the sound of their laughter filling the air.  It was absolutely idyllic.

Sometimes you realize food isn't the only thing that nourishes you.  Seeing those two particular faces made my heart swell and fill with a happiness that only old friends can bring.  We talked for hours & yet it seemed like only minutes had passed, I don't think we really even stopped to catch our breath.
It was exactly what I had been needing...

Before we knew it, dusk was about to set in and we all needed to hit the road back home,  though this time we promised it would not be the road less traveled.


Peaches with Mascarpone

Sonali & I were each given a bag of freshly picked peaches courtesy of Tracey & her boys.  They were so fragrant, they just oozed "peachiness".   Here is what I did with mine,  it was inspired by Nigella's Mint Julep Peaches.
  • 6 - 8 peaches
  • 1 1/2 cups water
  • 1 cup + 2 tbsp. bourbon
  • 3/4 c. sugar
  • 1/2 vanilla bean, seeds removed & set aside
  • 1 c. mascarpone
  • 1/4 c.  powdered sugar
  • juice of half a lemon 
peaches bubbling in their spicy sweet syrup
    1. Combine water, sugar, 1 cup bourbon, and the vanilla bean (not the seeds) in a medium saute pan over medium heat.  Whisk to combine and bring to a simmer.  Let it bubble away for a few minutes until the sugar is completely dissolved.
    2. Cut peaches and remove the pits.  Place carefully into the simmering syrup,  cut side down & cook for 2 minutes.  Turn over and cook 1 to 2 minutes more.  Depending on the ripeness of your peaches,  they may need to cook longer. 
    3. Remove peaches and carefully peel off their fuzzy skin.  
    4. Reduce liquid until it is thick & syrupy.
    5. Whisk together mascarpone, lemon juice, powdered sugar, seeds from vanilla bean & 2 tbsp bourbon until smooth & completely combined.
    6. Serve peaches with a dollop of mascarpone and drizzled with the thick, rosy peach syrup.
    7. Garnish with mint leaves.

    One Perfect Peach

    This dessert may not look like much,  but it is absolutely divine transcendent and well worth every minute of effort.


    My beautiful friends & me


    August 13, 2011

    A Night In

    Do you ever feel like you go through the same dozen or so recipes over and over?  Sometimes we all just get into a bit of a rut with dinner,  even me.   One of the wonderful things about writing this blog is that it forces me out of it. 

    Back in my restaurant kitchen days,  I'd work 14 hour days and the last thing I wanted to do at 2 a.m. was fire up the stove and cook for myself.  Most of us went to a diner after work or made a PB & J when we got home. 

    Sometimes I miss those days, believe it or not.  Not quite enough to do it all over again,  but the rush of a restaurant kitchen is pretty seductive.  The sound of ticket after ticket spitting out in front you, giving you all of your orders... you start calculating in your head just how people are out there waiting for your food!
    A professional kitchen is like a well choreographed dance.
    Everyone moves within inches of one another, speaking to each other every few minutes communicating your expected time to the pass.  There is a camaraderie unlike any other environment out there if you're lucky.  

    I have told this story many times to people over the years...  there was a single moment early in my kitchen days when all of us working at a certain well-known restaurant stopped what we were doing and looked up at each other. 

    We just stopped and finally someone verbalized what we were all thinking:  "it will never get better than this" and he was right.  That particular kitchen was absolute utopia.  We worked insane hours and we worked hard, but we were happy.  We stopped every day at 4 p.m. sharp to have family meal together and to just have a moment of peace before the hundreds of patrons descended upon us for for next 8 hours.

    It was an amazing experience that I look back on very fondly.

    The kitchen I currently work in can be just as hectic (especially around the holidays), which will be here before you know it.  I know I am not alone in having a crazy schedule. 
    There are people out there that have much more than I do to balance and we all have moments when we are just happy to get something on the table.

    I was reminiscing about restaurant days and thus,  this recipe came to fruition.  It takes pretty ordinary ingredients and makes them a little more special.

    Scallops with Pea Puree and Mint Oil
    • 6 scallops (ask your fish counter for U-10)
    • 1 cup + 2 tbsp.  grapeseed or canola oil
    • 1 bunch mint, leaves removed from stem (for mint oil)
    • 1/2 bunch mint,  chopped (for pea puree)
    • 3 cups peas (fresh shelled English peas are best if you can get them, if not use frozen)
    • 2 tbsp Boursin cheese
    • 4 tbsp creme fraiche or sour cream
    • salt & pepper

    1.  First the mint oil:  Blanch the mint leaves for 30 seconds in a pot of boiling water.  Strain and squeeze out as much water as you possibly can.  Wrapping a clean dish towel around it as you squeeze will help absorb more of the water.
    2. Break apart the mint leaves a bit with your fingers and add them to a blender with 1 cup of oil.  Put blender on full whack and let it go.  It will take a few minutes,  but the oil will become bright green and beautiful.  When it has come to that point,  shut it off and strain the oil through a fine sieve.  (If you have a chinois, use it.  If you have no idea what a chinois is,  you're not alone.  If you have cheesecloth, use it.  If not,  no worries...)  Mint oil is done.  Set aside.   (This can be done with any herb)
    3. Next is the pea puree:  Wipe out the blender and add the peas, Boursin, creme fraiche or sour cream and the half bunch of chopped mint.  Turn it on medium-high speed,  you may have to shut it off and move it around with a spatula to give the blender a little help...  Once the puree is fairly smooth and everything looks uniform and combined,  it's done.  Pour pea puree into a small pot and heat through.
    4. Finally,  the scallops:  Heat a pan over medium high heat and add the 2 tbsp of oil.  When the oil "shimmers",  pat the scallops dry, salt and pepper them and begin setting them in.  It is absolutely essential for the pan to be hot.  You are looking for a nice sear on the scallop.  I like to start at the top of my pan (12 o'clock) and work clock-wise from there.  That way I know which one was the first one in.  Cook scallops for 3 minutes each side, without disturbing them.  Remove from pan and set aside to avoid over-cooking.
    5. Place a dollop of pea puree on the plate and set scallop(s) on,  then dot with mint oil.


    Serves 6 as an appetizer or 2 as an entree.

      August 09, 2011

      Ice Cream Social

      Every summer when I was a kid, our church held an ice-cream social.  I know it may sound a bit "Little House on the Prairie",  but it really was fun and coincidentally since L.H. is my favorite show of all time, quite fitting I suppose.

      It was worth sitting outside in the sweltering heat and oppressive humidity of Midwestern summers... ice cream melting down my hand,  a sweet & sticky mess and completely content.

      In the fall,  it was fresh-pressed hot apple cider and cake donuts which were also swoon-worthy, but more on that another time.

      The ice cream socials were the highlight of the summer church events.  We would eat as much ice cream as we could get away with until we were nearly in a sugar coma.  If given the opportunity,  I could would still eat ice cream ad nauseam.

      I don't just have a sweet tooth, I have an entire set. 

      Strangely I don't normally like desserts that are cloyingly sweet,  I like them to bring a little something else to the table beyond pure sugar.

      While I do border on needing a program for my insatiable sweet tooth  (Hello. My name is Cheryl.  I have a problem with sugar...)  My Achilles heal is ice cream.  

      There is something about that sweet frozen yumminess. The unctuous "mouth-feel" of ice cream, the way it sits on your tongue and  freezes your whole mouth until the dreaded brain freeze sets in.

      Some people like plain old vanilla, with nothing in it.  Not my style.  I'm more of a pralines & cream, or chocolate with ancho chili kind of girl.   The smooth richness of the ice cream is what pulls me in,  but the "goodies" are what keep me coming back. 

      I like stuff in my ice cream,  whether it's nuts, cake bits, fruit, candy or (speaking of unctuous)  especially ribbons of salted caramel...  it needs texture.

      I received an ice cream maker for Christmas a few years ago and have yet to use it, so I thought what better way to try it out than publicly through a blog on the Internet where if I screw it up I can look like an idiot for all eternity.   No problem.

      When I was in high school, I met someone who would eventually become a good friend of mine.  She is from Lebanon and she introduced me to flavors that I had never had before.  To this day, her's is the best baklava I've ever tasted.  It was unique and not overly sweet, as most tend to be.  It was flavored with rose water and pistachios and these flavors remind me of her and they are still some of my favorites.

      I wanted to make something unusual and beautiful but it had to be delicious,  so I'm taking the flavors from Nona's baklava and using them for my ice cream. 

      The ice cream maker I have is a Cuisinart Flavor Duo.  It has side by side bowls that each hold 1 quart of ice cream.  The recipe will yield 1 quart of ice cream,  if your ice cream maker is larger or smaller, you will need to adjust the quantities.


      Rose Water & Pistachio Ice Cream

      • 1 1/4 cup whole milk
      • 1 cup half & half  (or heavy cream)
      • 2/3 cup granulated sugar
      • 1/2 tsp. vanilla
      • 1/4 tsp. kosher salt
      • 3/4 tsp. rosewater (find in Middle Eastern market or online)
      • 1/2 cup pistachios, roughly chopped
      • 2 drops red food coloring

      1. Whisk milk & sugar together for 1 - 2 minutes until sugar is dissolved.
      2. Stir in half & half, salt, vanilla, rosewater & food coloring.  Whisk another minute until everything is thoroughly combined and salt is dissolved.
      3. Turn machine on,  pour liquid in through top and let it run for 20 - 25 minutes.
      4. Add in the pistachios and let it mix for 5 minutes.   
      5. Done!  Ice cream will be like soft-serve at this stage.  If you prefer it more frozen,  transfer into airtight plastic container and freeze for 2 hours.


        and now, for the advanced class:

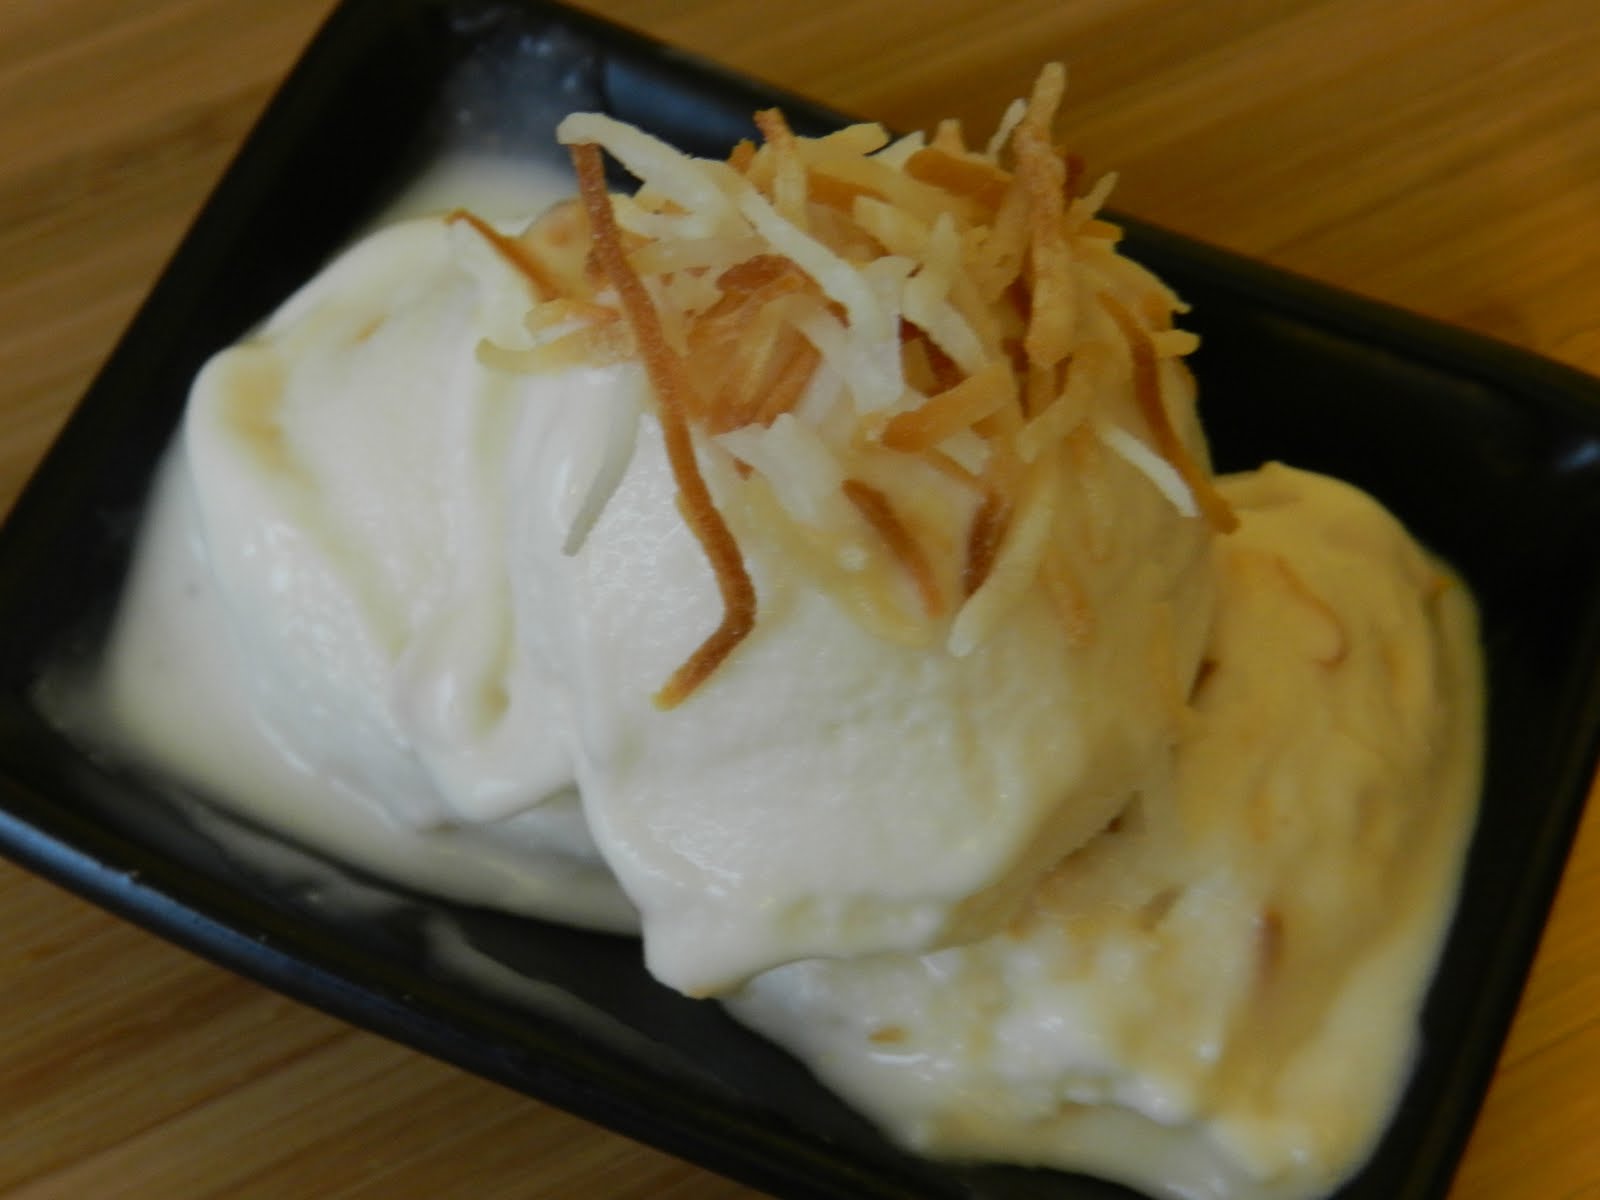
        Coconut Ice Cream with Toasted Coconut

        This ice cream requires a bit of cooking,  but nothing too taxing.   It is a variation on the base recipe from Jeni's Splendid Ice Creams at Home by Jeni Britton Bauer.  She is an ice cream genius based in Columbus, Ohio.
        • 1 1/2 cups coconut milk
        • 1 1/2 cups half & half or whole milk  (+ 1/4 cup on the side for slurry)
        • 4 tsp. cornstarch
        • 2/3 c. sugar
        • 1/4 tsp. kosher salt
        • 3 tbsp. cream cheese, softened
        • 1/2 c. shredded sweetened coconut, toasted
        • Ice bath= a medium sized bowl filled with ice water

        1. To toast coconut, place on sheet pan and bake for 3 minutes at 350 degrees.  Move it around and put back in for another minute or two.  It will go from golden brown to burnt very quickly, so keep an eye on it.
        2. In a small bowl,  combine the quarter cup of milk and cornstarch.  Whisk to combine & set aside.
        3. In a 4 quart saucepan, combine the coconut milk, half & half (or milk), sugar and salt; bring to a boil over med-high heat.  Cook for 4 minutes.  DO NOT walk away from the pot of boiling milk.  It can boil over very quickly, adjust the flame if it is too high to keep it at a steady low boil.
        4. Stir in the slurry.  Return to a boil and cook, stirring frequently, until thickened. (about 2 minutes)
        5. Place cream cheese in a bowl and pour a half cup of the hot milk mixture over it and whisk until smooth.   Whisk in the rest of the milk mixture.
        6. Pour mixture into resealable plastic bag (ziplock) and seal, trying to get out as much air as possible.  Submerge bag in ice bath until chilled.
        7. Snip corner off of plastic bag and pour into ice cream maker. 
        8. When there is approximately 5 minutes left for ice cream to finish, add in the toasted coconut and let it mix to combine.
        9. Transfer into plastic storage container and freeze until set.

        August 03, 2011

        Thai One On... Again (and once more after that).

        I am starting to think I missed my calling as a mixologist...   I enjoy coming up with new drinks and playing around with flavors to see what the end result is and there is no pressure to get it right because I'm just having fun.  Luckily there have been no casualties as of yet and surprisingly no bad drinks either.
        The "Thai One On" post featured the flavors of Thailand and I adore those flavors.  They are complex yet so clean and they hit every part of your palate.  I thought  "Why not make a drink with that flavor profile?"

        So I started thinking of what goes together and what flavors I enjoy...   It is fairly straight forward, nothing too complicated,  yet unusual.

        This is a drink I plan to break out when I want to impress. It is light and goes down quite easily... perhaps a little too easily.

        Ginger Lemon Fizz

        First thing is to start with the simple syrup:
        • 1 whole piece lemongrass,  cut into 4 
        • 10 quarter-sized slices of ginger
        • 4 leaves fresh basil
        • 1  1/2 cups water
        • 1 cup sugar
        (I used the thinnest piece of the lemongrass as a straw.  Waste not, want not and it looks cool. To do that, peel the outside layer of the thin part of the top off to make a straw BEFORE you bruise the lemongrass)

        With the BACK of the knife blade, bruise the lemongrass pieces. They should be slightly beat up, not pulverized.
        To take the skin off of the ginger, use a spoon and scrape down.  The skin will come right off.

        Once your lemongrass & ginger are ready to go, put everything in a small pot and bring to a simmer,  then shut off the heat & let it steep for 15 - 20 minutes.  Strain and chill the syrup.

        Use a lemon to wet the rim of your glass and dip it in sugar.   Fill the glass with crushed ice & add:
        • 2 shots limoncello
        • 2 shots simple syrup
        • 1 shot lemon seltzer


        These last few days have been so warm again that I wanted something frozen.  I am NOT a frozen drink kind of girl but sometimes you just have to have one.  I had plenty of the simple syrup left from the drink above, so I decided to make this one a 2-fer.

        A colleague gave me a bottle of Pama and I wasn't entirely sure what I wanted to do with it and like I said before,  making drinks is just fun for me so I decided to throw it in with the syrup & limoncello and a STAR was born.   This drink is soooo good I may have to re-think my stance on frozen drinks.


        Lemon Pomarita
        • 2 cups crushed ice
        • 2 shots limoncello
        • 2 shots pomegranate liqueur
        • 2-3 shots of simple syrup
        Blend on highest speed for about a minute until smooth. 


        Lemon Pomarita