Showing posts with label Dessert. Show all posts

July 02, 2013

Cherry Hand Pies


Do you remember your favorite childhood treat?  Mine was Hostess Cherry Pies.  Cloyingly sweet cherry pie filling encased in a lackluster pastry shell coated with a cavity-inducing glaze of white icing.  To think of eating one now does absolutely nothing for me, but the 10 year old version of me would slap me right across the face for such condescension.

It was my favorite of all the pies we had growing up, and believe me, there was no shortage.  On holidays there was the obligatory pumpkin, but once in awhile we were allowed to weigh in on this topic and when the opportunity presented itself, I always chimed in "CHERRY"!
(as I got older, and still to this day... it is peach)


Whenever stone fruit season rolls around, I, like most people, buy pounds of cherries, peaches, plums and nectarines...  and then am in a frenzy to use them up before they go bad.   It's like my Mom has always told me "Your eyes are bigger than your stomach".  I guess they still are. 

So, I find myself with a few pounds of cherries and I had a flashback to walking into Floyd's.
It was a little store on the walk home from school, almost more of a lean-to it was so small.

There was a creaky, old, wooden screen door that would slap shut with a "thwack" every time you walked in, paint barely clinging to it.
The floors resembled a patchwork quilt, tiles being replaced as needed, never all at once.
The cooler near the front hummed loudly as the compressor kicked on and off,  a reminder of where he kept the frozen treats.
Rows of cans and boxes lined up, fluorescent lighting sputtering and buzzing above me.  Being greeted by a gentle smile, always a smile.  My grandmother knew him and therefore, he knew us.  I remember buying bazooka gum for a nickel in that little store.  And Hostess cherry pies.

These portable packages would also be a perfect addition to a picnic basket or say a 4th of July gathering?   Just stack them up on a plate and let people help themselves.  No need for utensils, plates or clean-up, which in my opinion is the best thing about these.  They are little pockets of goodness.


Cherry Hand Pies
makes 18 -20 pies

For the Crust:
(crust recipe from Smitten Kitchen, just barely fussed with)

3 3/4 cups (470 grams) all-purpose flour
1 tablespoon fresh lemon zest
1 1/2  tablespoons granulated sugar
1 1/2  teaspoons fine sea salt
12 ounces unsalted butter, very cold and cut into small pieces
3/4 to 1 cup buttermilk


Whisk together flour, zest, sugar and salt in the bottom of a large bowl. Using a pastry blender, cut the butter into the flour until the biggest pieces of butter are the size of tiny peas. 
Gently stir in 3/4 cup buttermilk with a rubber spatula, mixing it until a bit of a mass forms, then knead it two or three times to form a ball.
If it doesn’t come together, add remaining 1/4 cup buttermilk, 1 tablespoon at a time, until it does, then gently knead again. (I had to add all of the remaining 1/4 cup)
Divide dough in half. Wrap each half in plastic wrap and flatten into a disc. Chill in fridge for at least an hour or up to two days.  (Life got in the way & mine was in there for 3 days... It was fine)

Egg Wash:
1 egg beaten with 1 tablespoon water.  If you want to dust the top with sugar, you will also need sanding sugar or any coarse sugar.
-prepare egg wash, get out the pastry brush & set aside.


Cherry Filling:
3 cups pitted cherries, roughly chopped (about 1 1/2 pounds whole cherries)
1/3 cup granulated sugar
1/4 teaspoon salt
1 heaping tablespoon cornstarch
juice of half a lemon


Combine the cherries, sugar and salt in a medium pot over medium heat.  Cook for about 5 minutes, stirring occasionally, until the sugar dissolves.
Increase heat slightly to bring to a simmer for 5 more minutes. 
In a small bowl, dissolve cornstarch in a few teaspoons of the cherry juice from the pot and stir until smooth.
Pour the cornstarch mixture back into the pot and cook, stirring constantly, until thickened (about 6 to 8 more minutes). Turn off heat and add lemon juice.  Stir to combine.
Transfer to a non-metal bowl and allow to cool.


Assembly line:


Pre-heat oven to 400 degrees and line 3 baking sheets with parchment paper.
Generously flour the counter top, then unwrap one of your disks of dough.  Gently begin rolling it out, starting from the center and pushing outward.  The dough will be pretty firm when you begin, so be patient, but it will warm quickly, so not too patient!
Keep rolling from the center out, turning the dough as you go, until it is about 1/8 inch thick.  If the butter in the dough begins to get too warm and it starts to stick to the pin or gets goopy, slide it onto a baking sheet and put it in the freezer for a few minutes to firm up again.
Once dough is rolled out, cut out with a 2 1/2 - 3 inch cutter, whatever shape you have, or use a knife and cut into squares.  I only had a round cutter of the appropriate size, so that's what I used.
Lightly brush half of your circles or squares with the egg wash, taking care to get the edges, cut vents in the center of the other half of your circles/squares.  Place 1 rounded teaspoon of filling in the center of the egg washed halves and top with the vented pieces. (don't overfill!)  Seal with your fingertips or press with a fork along the edges.
Brush with the egg wash on top and sprinkle with coarse sugar.  Chill in refrigerator before baking if dough begins to get mushy.  Repeat with remaining disk of dough, filling, etc.
Place on baking sheet 1 - 2 inches apart and bake for 15 - 18 minutes until golden and puffed.

Eat. Repeat.

May 10, 2013

A foolish mess...


Let me say that I think we should appreciate our Mom's on more than just one day a year...  It is an incredibly important job that is sometimes thankless.
Through terrible two's and rebellious teenage years, through laughter and tears, joy and fear... you are there for it all.
So, to every Mom out there:  Happy Mother's Day today and everyday for all that you do!
Now that I've earned my birthday and Christmas presents for next year, let's get to it.  

This weekend is Mother's Day and the Internet, food magazines, morning shows, cooking shows, even the evening news is filling the space between our ears with recipes to make for Mom...
Most of them even look really good!  But here's the problem:  MOM isn't the one making them!
(I hope!)  

More than a few of the recipes featured have ingredient lists long enough to make even the average home cook sweat under the collar, much less someone who rarely ventures into that mystical space from where food magically appears.

May 01, 2013

Key Lime Pie


Key Lime Pie.   These three little words make me sit on the edge of my seat in anticipation.  In my book, it is one of the most perfect desserts.  The fact that it is ridiculously easy gives it major bonus points. 
Growing up, I don't think I'd even heard of key lime pie.  We had apple, peach, strawberry-rhubarb, blueberry, pecan, pumpkin, lemon meringue, chocolate cream, but never key lime. 

Perhaps that is why I have developed a serious love for this barely green, barely sweet little tart.
We weren't introduced until I was able to have a proper appreciation for something so perfect in its simplicity.
My insatiable sweet tooth has been discussed on several occasions right here on this very blog and although I won't deny that I love dessert, what I do not love is desserts that are cloying.

That makes this pie the perfect sweet for me.  It is creamy and smooth,  just barely sweet with a nice tart bite that gets you right on the sides of your tongue making you immediately go back for more (or maybe that's only me).
The graham cracker crust harkens back to pre-school with it's sweet smell that makes one long for mandatory nap time.


Key Lime Tart
recipe barely adapted from America's Test Kitchen

I wouldn't dare suggest that you only make this pie with actual key limes, as most of you probably don't have access to them.  I made this filling with regular (Persian) limes and their zest.  I also tried bottled key lime juice, but preferred the juice of fresh limes for their bright, citrusy flavor.

Normally, the filling for this pie is not cooked and it sets up in the refrigerator.  I'm sure those of you that have ordered (or even made) key lime pie have found yourselves a bit disappointed on occasion.  Although the filling is set enough to slice, it can be a bit too loose.  After reading dozens of recipes, I found a solution: 
a short stint in the oven to set the filling resulted in a creamy, custard-like filling that set beautifully and sliced perfectly clean. 

-This recipe will make a 9" pie or 4 tarts (4 1/2" size)


For the filling:
4 large egg yolks
1 heaping tbsp. grated lime zest
1/2 cup fresh lime juice (about 5 - 6 limes)
1 can sweetened condensed milk (14 oz)
tiny pinch salt


Whisk egg yolks and lime zest together in a medium bowl.

After 1 1/2 - 2 minutes, your mixture should look like this.  Bright yellow - green from the lime zest.  No need for green food coloring!

Whisk in condensed milk until mixture is smooth, then whisk in lime juice.  Cover and set aside.

Now make the crust...


For the Crust
8 graham crackers, broken into pieces
5 tbsp. unsalted butter, melted and cooled
3 tbsp. sugar
pinch salt


Preheat oven to 325.   Put graham crackers in food processor and run for about 45 seconds until you have fine crumbs.   Pour melted butter over crumbs, add sugar & salt and pulse (5 -7 times should do) until you have what resembles wet sand.


Pour crumbs into pie plate, (or if using tart molds: 1/4 - 1/3 cup in each) pressing crumbs into an even layer on bottom and sides. 
Using the bottom of measuring cup makes this task much easier!
Bake crust for 13 - 16 minutes (tarts: approx. 12 minutes); remove from oven and set on wire rack. 
Do not turn off oven.

Pour filling into warm pie crust and bake 15 - 18 minutes (tarts: 10 - 12 minutes).  Remove from oven and let them cool for about an hour before refrigerating. 
Once cooled, place in refrigerator for 2 - 3 hours until chilled and set.

Top with whipped cream.

March 13, 2013

The Devils (Food) Made Me Do It...


My days of tipping back green beers at a packed in like sardines Irish pub are long behind me (thankfully), but being the good Irish lass that I am, I still enjoy a bit of silliness on St. Patrick's Day and bow to the obligatory "green something".

This year, I've decided it should come in the form of a cupcake.  It's as good as any other choice and I'd take a cupcake over a green beer any day of the week.

When my brother and I were younger, we had a next door neighbor that would bring us a box of Andes candy to share.  You would have thought he gave us each a $100 bill we were so excited... as we got older, sometimes we each got our OWN box.  Now that was newsworthy.

January 21, 2013

Blushing Valentine


I know it may seem a bit early to start thinking of Valentine's Day, but it's only a few short weeks away.   If you like to make a special treat on Valentine's Day, this is the cake.  
It is a towering 4 layers high and lovingly encased in the most delicate rose-scented buttercream.  It is outrageously good and worth every. single. calorie.  

This is also the type of cake that could easily become adorned with say a few candles for a little celebratory birthday party?   The colors could be swapped out for any, the flavor of the buttercream could be adapted to whatever you'd like it to be.  Using a vanilla base for both cake and buttercream allows you the flexibility to change colors and flavors to suit the occasion or intended recipient.

Typically, when we think of Valentine's Day desserts we usually think of chocolate.  I won't even pretend that I'm not one of them, but sometimes the "molten lava cake" or "ganache-covered devils's food" is well... a bit played out.

This cake is a show-stopper and you might not even miss the chocolate.


For the cake:
3 sticks unsalted butter, room temp
3 ½ cups sugar
4 cups King Arthur AP flour
4 tsp. baking powder
1 tsp salt
12 egg whites-Pete & Gerry’s Heirloom Eggs, room temp
2 cups whole milk, room temp
4 tsp vanilla
Deep pink gel food coloring


Place racks in middle of the oven and preheat to 350 degrees.  Butter and flour 4 cake pans.  I used 6", but 8 inch will work as well (the cakes will not be as tall).


In the bowl of a stand mixer, beat butter and sugar together for 5 minutes until light & fluffy.

Sift flour, baking powder and salt together and set aside.
Combine egg whites, milk & vanilla together and set aside.

Add roughly 1/3 of the flour mixture to the butter and sugar, followed by half of the milk mixture.  Scrape down bowl, and then add another 1/3 of the flour mixture and the rest of the milk.  Scrape down again and add the last of the flour.

Divide batter into 4 equal portions.

      One portion will remain white.  In the remaining 3, mix in food coloring.  Add 3-4 drops to the first layer, 6-7 drops for the second and 9-10 drops for the last layer.  Mix thoroughly until color is uniform. 

      Pour into cake pans and bake for 25 – 30 minutes, rotating cakes halfway through baking time.  Cake is done when knife inserted comes out clean.  Cool in pan for 10 minutes, then carefully remove from pan and transfer to a cooling rack to cool completely.

Wrap in parchment paper and plastic wrap and chill at least 3 hours.  Using a long serrated knife, trim off the domed top of cake to make it even and flat.   Once all cakes have been trimmed, set aside.


For the Rosewater Buttercream
4 egg whites: Pete & Gerry’s Heirloom Eggs
1 cup sugar
3 sticks unsalted butter at room temp, cut into tablespoons
½ -1 tsp rosewater


      Set a bowl inside of a pot of simmering water, making sure the bottom of the bowl does not touch the water. Combine egg whites and sugar, whisking frequently until sugar has dissolved. 

 You can test this by carefully running your finger through a stream of egg white falling from whisk, then rub your thumb and finger together.  If you feel any grains of sugar, it is not ready.

      Once sugar is completely dissolved, transfer mixture to the bowl of a stand mixer fitted with the whisk attachment.
      Beat egg white mixture on high speed until it holds stiff peaks and mixture is cooled, about 5-6 minutes.
  
      Turn mixer down to medium low speed and begin adding butter, a few tablespoons at a time, let butter incorporate before adding more.


      After all the butter has been added, add rosewater and beat for another 30 seconds.
      Set darkest layer of cake on cake plate and apply a layer of buttercream to top.  Following with remaining layers, ending with white layer on top. 

Apply a thin crumb coat of buttercream to entire cake and chill for 30 minutes.


When crumb coat has hardened, apply buttercream and smooth with an off-set spatula.
Cut with a very sharp knife and serve!


December 11, 2012

Pour Some Sugar on Me!


It's Christmas cookie time again and that means the cookie exchange!  However, if you are buying jar after jar of colored sanding sugars to sprinkle on your creations it can get very costly rather quickly.

Working in this business has made me acutely aware of what things REALLY cost.   Walking through stores and seeing someone pay $4.50 for a tiny 3 ounce bottle of colored sanding sugar for example...   I know that they could make huge bags of it for $4.50.

I have a drawer full of them, I'm not immune to be sucked in by all the pretty colors... but no more!

It's not that I'm cheap;  I prefer to think of it as frugal, but what gets under my skin is paying an exorbitant amount of money for what I'm getting.
It's all about getting a decent value for your money. 
So, with that said:  We are going to make our own sanding sugars this year for a fraction of what we would pay at the grocery store.


DIY Sanding Sugars

clear sanding sugar, can be purchased here
gel food coloring  (I don't recommend liquid)
pinch of cornstarch (optional)
wax or parchment paper lined sheet pan

gel color in squeeze bottles
 
 
The easiest way to do this is in a zip-top quart or gallon bag.  You can smoosh (yes, that's the technical term) it around inside the bag with your hands and there is virtually no mess to clean up.
 
gel colors in little pots
 

I tend to make it in large batches, so I usually use a bowl and a whisk to get started and then mix with my hands.  Unless you are making a few pounds at a time, the zip-top bag would be the way to go...

For a normal batch of cookies or cupcakes, start with 1/2 - 3/4 cup of sugar.


Pour sugar into bag and add 1 drop at a time of gel food coloring.


Starting to look like sea glass!


Mix it around in the bag until color is consistent throughout.  If color isn't dark enough, add another drop and repeat until you reach desired shade.


IF you find your sugar is a bit clumpy or sticky from the food coloring, add a pinch of cornstarch and mix thoroughly.  I only do this when I have added quite a bit of color.   
The cornstarch helps to keep the sugar from clumping together, but it also makes it less shiny. 

Once you have reached your desired color, pour the sugar out onto your lined sheet pan and spread it out into a thin even layer so it can dry out a bit.   When sugar is no longer "tacky", store in airtight jars.   It will keep for months!

December 07, 2012

Gingerbread Cakes


Gingerbread and a cup of tea. 

This is what comes to mind when I think of my father's mother.  Sitting in her kitchen, eating a slice of gingerbread and having a cup of tea while she leaned against the sink with the sunlight shining in through the window on her smiling face.

The memories I have of her are few and far between.  She lived in Newfoundland and I lived in Ohio.  Spending time with her and getting to know her wasn't very easy given the 1600 mile separation.  I was about 16 years old when I asked her for this recipe, somehow even back then I related through food.

If you know nothing at all of Newfoundland,  this is one thing I experienced over and over:  
Visiting is practically an Olympic sport and they excel at it.  You are offered a cup of tea as soon as you cross the threshold and of course something to eat with the tea... whether it be toast, cookies, cake, etc.

At first I thought this was just something that my relatives did.  Then I quickly realized after nearly bursting out of my jeans, it was what everyone did.

The recipe below is slightly tweaked (although not much) from Nanny's original recipe. I had thought about adding a ganache or a creme anglaise to it, but decided to leave well enough alone.  

As you go "visiting" this holiday season, take a few of these with you to share as you make the rounds... 
Put the kettle on, stay for a cup of tea and make some memories.


Gingerbread Cakes

2 cups AP flour
1/2 cup butter
2/3 cup molasses
1/2 cup packed dark-brown sugar
1 egg
1/2 cup strong tea
1 tsp powdered ginger
1/4 tsp ground cloves
1/2 tsp ground cinnamon
1/4 tsp fresh grated nutmeg
1/4 tsp salt
1 tsp baking powder
1 tsp baking soda


Preheat oven to 350 degrees.  Butter and flour a mini bundt pan (or muffin pan) and set aside.
In a small bowl, add baking soda to tea, stir and set aside.


In a medium bowl, combine flour, baking powder, ginger, cinnamon, cloves, nutmeg and salt; set aside.


Using paddle attachment, cream butter and brown sugar until light and fluffy, 2 to 3 minutes.
Add egg and beat until incorporated.  Add molasses and tea mixture.


At this point, the batter will appear broken.  Don't panic, it will come together once flour mixture is added.


Scrape down bowl, add flour mixture and beat until combined.


Divide batter evenly, filling about 2/3 up.  Bake, rotating pan halfway through, until knife comes out clean, about 15 - 18 minutes.  Let cakes cool slightly in pan.  Remove cakes and place upside down to cool completely on wire rack.


Dust with powdered sugar.


August 04, 2012

Plum Crazy...


Maybe it's just me, but it seems like every year summer goes by even quicker than it did the year before. 
I wait and wait all winter for stone fruit season to arrive,  daydreaming about all of the amazing things I'll make...  fantasizing about juicy peaches, ripe plums and perfect nectarines. 

Awaiting that first taste of summer, sinking my teeth into the perfect bite, juice dribbling down my chin... 
and then it's August.

When did that happen?!   I realize I barely had a chance to make any of the delectable things I spent so many hours, days, weeks thinking about.  And here we are again, summer more than halfway gone.
So, upon this rather startling revelation I decided I had better get it in gear if I was going to accomplish at least a few of the things I had set out to do.

For those of you who may not know, a crostata is a single-crust, free-form pie.  This is good news for the likes of me as I find rolling out multiple pie crusts in the heat of August a nearly impossible feat. 
If I had central air-conditioning and a marble slab in my kitchen, I'd be much more agreeable.


Plum Crostata


for the dough:
  • 1 1/4 cups all-purpose flour (plus extra for dusting)
  • 2 tbsp sugar
  • 1/4 tsp salt
  • 1 stick butter (not margarine) cubed into small pieces & chilled
  • zest of one lemon
  • 3 tbsp ice water

In the bowl of a food processor,  pulse together dry ingredients until well combined.   Add in butter until mixture resembles coarse crumbs.  I usually keep my butter in the freezer for this so it stays really cold as it is being incorporated.   Add in ice water, pulsing machine until it almost forms a ball.  Do not over work dough.  Remove from food processor and flatten into a disk.  Wrap dough in plastic and refrigerate for at least an hour.   You can do this a day ahead.


for the filling:
  • 6 ripe plums, sliced 1/4" thick ( I used red & black plums)
  • zest of 1 lemon
  • juice of 1/2 lemon (or 1 whole, if small)
  • 5 tbsp sugar
  • 2 tbsp flour 
Mix all ingredients together and set aside.


for glaze:
1 egg
2 tbsp honey
1 tbsp sanding sugar


assemble crostata:

Preheat oven to 400 degrees.

Remove dough from refrigerator and place on a baking sheet lined with parchment paper and lightly floured.  Press out the dough until it is approximately 11 inches in diameter. 

You can roll it out with a pin if you like but I chose to just press it out.  My kitchen was very warm and the dough was getting a little too soft, as the butter in the dough was beginning to melt so I had to go with it.  I had already put it back in the refrigerator once...  It was just too warm of a day (lesson learned). 

Place fruit in center and bring up edges of dough to the center, pleating dough as you go.  If you really want to impress, lay fruit in a circular pattern and then fold dough over.  If dough breaks, don't sweat it...  just pinch it back together.  It's supposed to be "rustic", right? 
Well, mine certainly was! 
(The crust didn't hold in a few spots,  let's just say that gave it "personality")

Brush crust with honey/egg mixture and sprinkle sanding sugar on crust.
Bake for 20 - 30 minutes until crust is golden brown and fruit is bubbling.

A scoop of vanilla ice cream on this would be divine...  just sayin'


.

July 15, 2012

Redemption Brownies


Recently, I made brownies and did not have chocolate in the house to melt down.  So, I made them with only cocoa powder.  It was an epic fail.
Lesson learned, do not take short cuts with brownies. 

Feeling extremely unsatisfied with that batch of bad brownies, my craving for them was unfulfilled.
Seeking redemption, I decided that this effort had to be proportionately as good as the last batch was bad...  meaning, these brownies had to rock. 

I had about a cup of dulce de leche left over from this and aside from eating it straight from the container with the biggest spoon I could find (a thought which I seriously entertained), I decided that I should be a bit more creative.

Needing to expunge the memory of these humdrum brownies, it was clear that this was what my leftovers were intended for.

Making brownies from scratch takes about 5 minutes longer than making them from a box.   The only extra step is melting chocolate into butter, the rest of the process is the same. 

To say that brownies from scratch are the same as boxed mix is like saying cheese in a can is the same as an aged cheddar.

We have all used boxed mixes or frosting in a can, but sometimes you need to have the real thing and this is most definitely the best brownie I have ever made.


Dulce de Leche Brownies

  • 8 tbsp unsalted butter, room temp
  • 6 ounces bittersweet or semisweet chocolate, finely chopped
  • 1/4 cup unsweetened Dutch-process cocoa powder
  • 3 large eggs
  • 1 cup sugar
  • 1 tsp vanilla extract
  • 1 cup flour
  • 1 cup dulce de leche


Preheat the oven to 350 degrees.


Line an 8-inch square pan with a long piece of parchment paper or aluminum foil that covers the bottom and comes up over the sides.  Place another sheet over, making a large cross with the edges that overhang the sides.  Grease the bottom and sides lightly with butter or non-stick spray.

Melt the butter in a medium saucepan.  Add the chocolate pieces and stir constantly over very low heat until the chocolate is melted.  Remove from heat and whisk in cocoa powder until smooth.  Let cool slightly, to ensure eggs do not "scramble" when added.  Add eggs, one at a time, then stir in sugar, vanilla, then flour, just to combine.  Do not over mix.


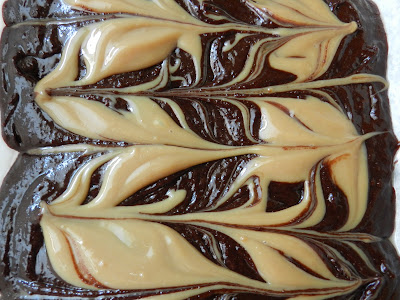
Scrape half of the batter into the prepared pan.  Drop one-third of the dulce de leche, evenly spaced, over the brownie batter, then drag a knife through to swirl it slightly.  Do not drag the knife through too many times, or you will not have lovely pockets of dulce de leche, you will have incorporated it into the batter.

Spread the remaining brownie batter over, then drop spoonfuls of the remaining dulce de leche in dollops over the top of the brownie batter, drag a knife through to swirl again.  Try not to drop the dulce de leche exactly where you did underneath, that way you will get an even distribution throughout.


Bake for 35 - 45 minutes.  The brownies are done when the center feels just-slightly firm.  Remove from oven and cool completely.   Lift out of pan with overhang of paper/foil.


These brownies actually become better the second day and will keep well for up to 3 days.


Recipe: David Lebovitz,  The Sweet Life in Paris


    June 20, 2012

    Salty Sweet Delicious Treat


    One of my favorite treats when I was young was homemade caramel corn.  Now let me tell you, this was a rare treat indeed.  I nearly had to beg with tear-filled eyes to get it because making it left a sink full of dirty dishes and a bit of a mess in the kitchen.

    My grandmother would would make the popcorn on top of the stove, as we didn't have a microwave then, and then she would make the caramel and drizzle it on top of the popcorn and mix it up as fast as possible before all hardened.

    There is nothing like it.  The caramel corn you buy at the grocery store can't even come close to homemade.  There are pieces that are just barely kissed with caramel, then there are other pieces that are fully enrobed in caramel...  nothing perfect and homogeneous about Grandma's caramel corn and that is part of what made it so good.

    I wanted to put a  twist on this most delicious treat and elevate it to something you could actually serve to guests (not that I wouldn't put out a big trough of caramel corn, but you know what I mean).

    Instead of making a traditional dulce de leche, I know there is a "cheat" method which simply involves simmering the can with a few holes poked through the top.  I must be honest, this never appealed to me. 

    I'm a bit of a purist with most things and I will admit, simmering milk in a can was a bit unsettling and it seemed kind of lazy.   Those of you that have done it, I know what you're thinking, so let me save you the trouble. 

    Shame on me.  It was AWESOME!  I thought it would somehow taste metallic (it didn't) and that it couldn't possibly be as good as making it the "right" way (it was damn close).

    It was almost zero effort except for a little whisking when it came out of the can.  It couldn't have been easier.  Really. 

    This revelation has made me seriously question why I was so snobby about not making it like this before.   I doubt that I'll give up my purist ways, but once in awhile when I'm short on time or energy, this will be my method of choice.


    Salted Dulce de Leche Popcorn Tart
    makes 3 - 4" tarts or 1- 9" tart
    • 1 can sweetened, condensed milk
    • 8 cups popcorn (buy it, pop it on stove, microwave...  doesn't matter)
    • 4 tbsp butter, room temp
    • 2 tbsp sugar
    • 1 tsp kosher salt
    • 1/4 tsp freshly ground black pepper
    Carefully make 3 holes in the top of the can by hammering a nail through the lid.  (I am shaking my head as I'm typing this...  I can't believe this is a step in a recipe).  Most people only make 2 holes, but I felt better giving the pressure inside the can another outlet from which to escape.  Exploding can of condensed milk was not on my agenda.

    Set the can inside of a pot and fill with water until the water is about 3/4 the way up the side of the can.  Bring to barely a simmer and let it go for 4 hours.  You will have to replenish the water occasionally so that the level doesn't get too low.  You want to make sure the water is at least halfway up the side of the can at all times.

    After 4 hours, carefully remove can from hot water and open.  Pour contents into a bowl & whisk about 4 - 5 minutes until smooth.   That's it.  Really.


    To make popcorn crust:  Combine popcorn, butter, sugar, salt & pepper in food processor and blitz until rubble.

    Press the popcorn mixture into tart mold(s).  I prefer the ones with a removable bottom, it makes getting the tart out much easier.  Use a small measuring cup or glass with a flat bottom to press into the sides and bottom of tart to make sure everything is even.


    Refrigerate for an hour.  This will allow everything to set up, the butter to harden, etc.  Place into a 375 degree oven for 10 minutes.  Remove from oven and let cool completely.

    Pour dulce de leche into cooled popcorn crust and top with flakes of sea salt.  Dig in.